Road noises detract from our driving enjoyment, drown out in-car entertainment and make hands-free calling nigh on impossible when driving at speed. Whether you own a classic or modern example, our MGs achieve top marks for style and handling but are let down by wholly inadequate sound proofing and thermal insulation. Built to a price, MG chose the cheapest materials possible, borrowing bitumen and dacron from the building industry to offer minimal acoustic and thermal performance. These original factory fitted materials are simply not cut out for road use, where contaminants such as oil and water lead to their rapid deterioration.
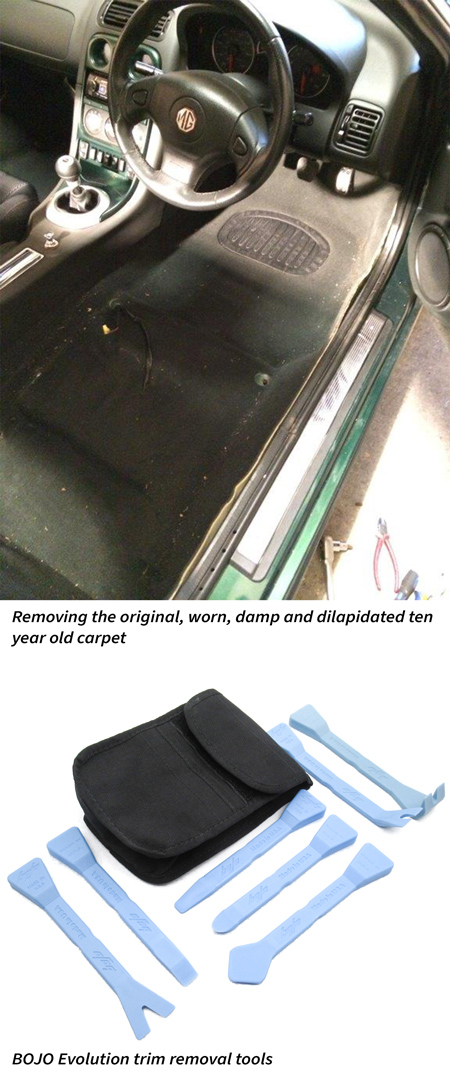
Take my example, I recently noticed the smell of damp in my wife’s MGTF and realised to my dismay having parked the car on a slope during a deluge, rain water had entered the hoodwell, spilled down the rear bulk-head carpet and travelled under the seats to the end of the footwells. The car’s interior was saturated and the realisation dawned upon me that if left unchecked corrosion would set in and the damage would be considerable.
If I was going to resolve the problem myself I thought I would take the opportunity to improve the car’s sound deadening and thermal insulation as I felt the original materials under performed with the car being tiresome to drive over long distances. It was important that my investment both with regard to the products I purchased and time invested would return significant benefit in terms of ride quality, so I chose the best performing materials on the market selecting a combination of Dynamat Extreme, Dynaliner and Dynapad to reduce road noise and block heat. I also decided that it was time to replace the carpets which were now ten years old, wearing thin and had rapidly degraded following the leak. Even after a full week of drying out in a heated garage I was staggered to find the hoodwell insulation, rear bulkhead pad and floor carpet was still sodden on removal. A small spot of corrosion on the rear bulkhead panel was evidence enough to show that left much longer corrosion would have set in.
To carry out a comprehensive installation I used the following: two bulk packs of N203 Dynamat Extreme, one roll of N204 Dynaliner 1/8”, N205 Dynaliner 1/4", N206 Dynaliner 1/2", N208 Dynapad, 12 loom ties, contact adhesive and N812A MGTF carpet (includes soundproofing) or for MGF, N800A Carpet Set plus N811 Soundproofing Kit.
Tools Required
Roller, Screw Drivers, Torx T50 socket, Ratchet, Sharp Knife, Scissors, Tape Measure, Permanent Marker, Greaseproof Paper, Pliers, Bungee, Rubber Mallet, Crocodile Clips
SAFETY WARNING
To avoid inadvertently detonating the vehicles seat belt pre-tensioners disconnect the vehicles power supply and leave to disarm for a full fifteen minutes to allow any residual current to eek away.
Step 1 Seat Removal
With the hood lowered, use the seat adjuster to slide the seat fully rearward to give access to the two front Torx fixings securing the front of the seat frame to the floor and remove using a T50 Torx drive. Given the proximity of the inboard seat runner fixing to the seat bolster cushion and to the centre console, a socket extension is required to aid removal. Next, use the adjuster to slide the seat forward to expose the two Torx fixings securing the rear of the seat. Having removed all of the Torx fixings (4 per seat) gently raise and tilt the seat towards the transmission tunnel, note the routing of the pre-tensioner loom for reassembly and disconnect using a small slotted screwdriver being careful not to break the connector. Remove the seat belt webbing fixing on the outboard side of the seat using the T50 Torx drive and rotate the adjuster wheel clockwise, tilting the back rest forward to aid seat removal. Carefully remove the seats being sure not to contact the car body or disturb the position of the seat runners.
Step 2 Carpet Removal
Gently ease the rubber door seals away from the body of the car starting at the area below the dash through to the top of the B post to expose the edge of the carpet. Use a Philips screwdriver to remove the two self-tapper screws securing the console extensions (kick panels) and interior lamp. Slide the extension piece rearward and down, away from the centre console and disconnect the two insulated spade terminals on the rear of the trim panel leaving the lamp in situ (repeat for both sides of the car). Remove the two pozidrive screws either side of the transmission tunnel close to the handbrake lever. On the driver’s side use an 8mm socket to remove the three fixings securing the drivers foot rest. Locate the large domed plastic carpet fasteners in both foot-wells and the rear bulkhead carpet and remove using a large slotted screwdriver. You will also find a further four smaller diameter plastic carpet fasteners, two on the outboard sides of the car nearest the door jambs. These fasteners are best removed using a trim removal tool. We recommend using Bojo trim removal tools which are used extensively within the aerospace, vehicle manufacturing and motor racing industries. The tools are manufactured from flexible heavy duty nylon to aid safe removal of interior trim. Remove the screws securing the three hood cover fixings on the top of the T Bar. The T bar is also held in place using six fir tree fixings, two on either side of the car near the door jamb and two in the centre. Partially raise the hood frame to clear the T bar and prise the outer edges of the trim towards the front of the cabin. Be careful not to apply too much force particularly on the outer edges of the T bar where it is at its thinnest as it is easy to damage. Remove the screws securing the seat belt escutcheons and feed the seat belt fitting through the T bar before setting to one side. Next, disconnect the speaker bar loom connector (if fitted) and microwave security unit (if fitted). Remove the four screws securing the console lids and set to one side. Remove the rear console section by unscrewing the two self-tappers located in the uppermost cubby. The bulkhead carpet and bulkhead insulation pad can now be removed, by using circlip pliers to unscrew all nine of the retaining female carpet fixings. Finally you can remove the carpet noting that the single piece design of the MGTF carpet requires cutting along the centre line to avoid complete removal of the centre console. The bulkhead insulation pad is best left in situ as removal requires further disassembly of the dash.
Step 3 Applying Dynamat
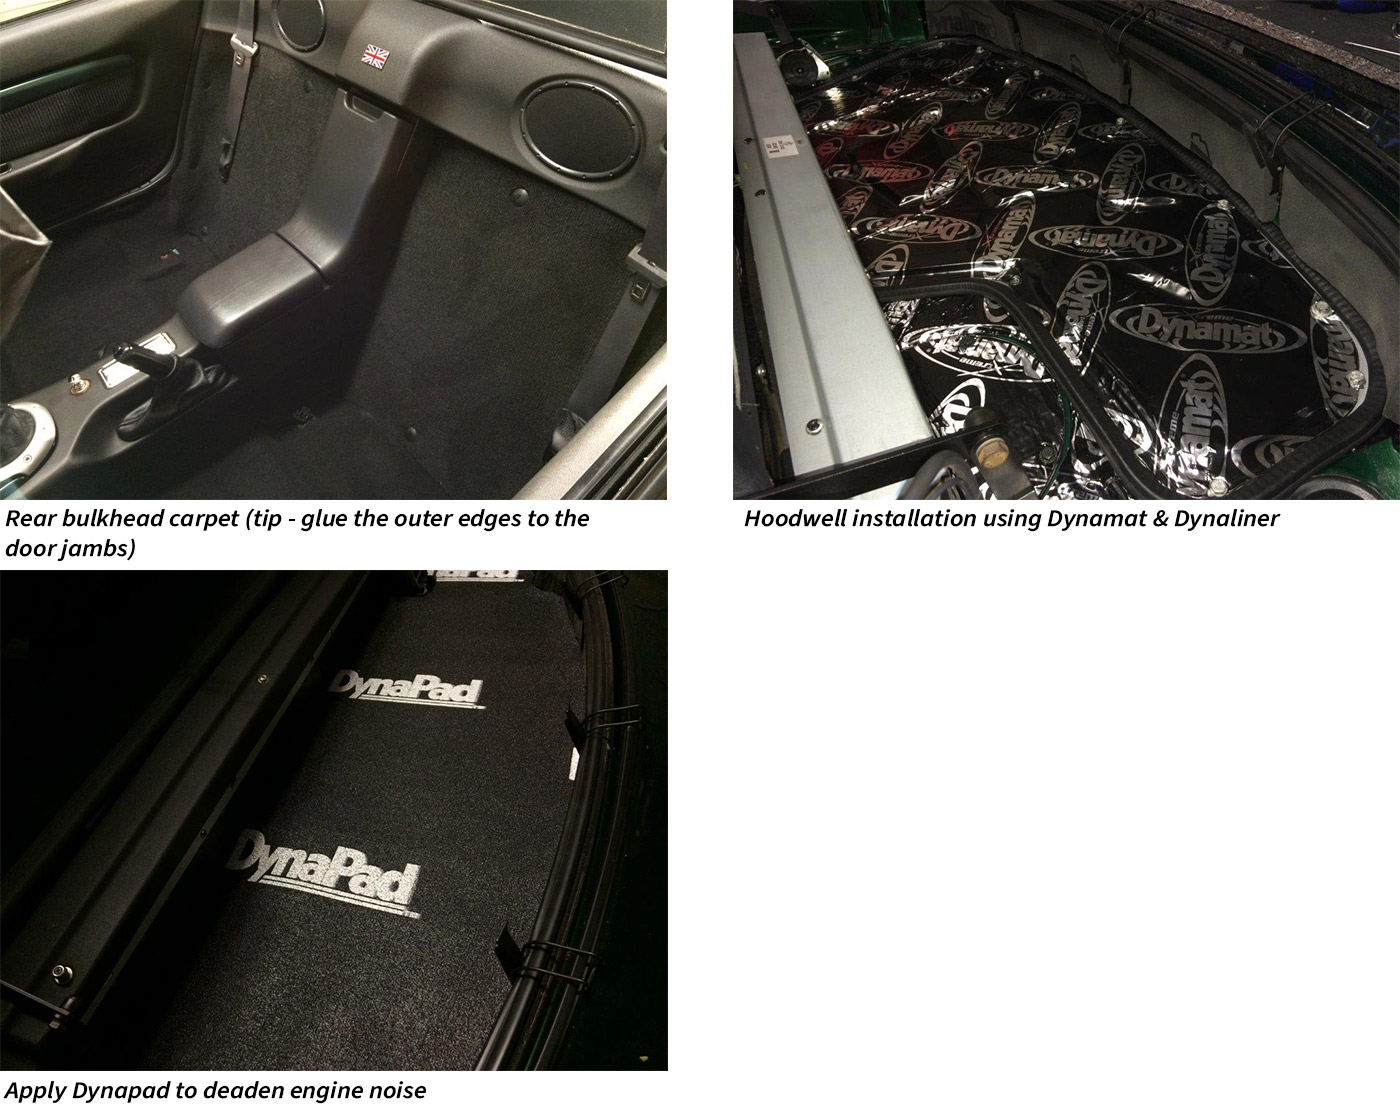
Thoroughly clean surfaces of any dirt, grease or moisture and treat corrosion. It’s a good idea at this point to don a pair of gloves before handling Dynamat to protect your hands from cuts. Start by offering up a full sheet (18”x32”) lengthways over the floor pan, when satisfied with the position remove the backer sheet and use the roller to ensure proper adhesion, using the rear of the tool in tighter areas. Locate any fixing holes using a screw driver to punch through the Dynamat and clear any residual material with a sharp knife. For optimum effect continue to lay the Dynamat so that it abuts each join until the floor, footwell, sill, door jamb and rear bulkhead are fully covered. For more complex areas use a sheet of greaseproof paper and a marker pen to produce a template, remembering to reverse the template when transferring the shape onto the rear of the Dynamat backing sheet. To carry out a thorough cabin installation it will be necessary to remove up to nine loom ties securing the pre-tensioner looms and main wiring harness to the body. It’s a good idea to have some replacements in the likely event that they break on removal. To remove the fixings securing the control cables on the driver’s side simply pop the cable from each retaining clip and unscrew the fitting from the body. Having applied Dynamat to the cabin area now would be a good time to repeat the process in the hoodwell area. Partially raise the hood to allow access to the five spring clips that hold the hood to the rear deck. Carefully lift the hood out of the rear deck channel taking care to roll the plastic rear window to avoid cracking. For glass rear windows, disconnect the heated rear window loom located under the carpet and close to the left hand seat belt mechanism before raising. To prevent the rear hood bow from getting in the way temporarily secure to the front header rail using a bungee. Remove the carpet and the layer of hoodwell insulation. Remove the eleven 10mm headed bolts securing the engine cover to the hoodwell. Remove the engine cover to a large flat surface and take off the seal before applying a full covering of Dynamat remembering to clear all fixing holes before refitting the rubber seal. Apply Dynamat to the remaining hoodwell area and refit the engine cover.
Applying Dynaliner
Use Dynaliner to block heat and further improve acoustic isolation. Dynaliner is self-adhesive and comes in three thicknesses; 1/8”, ¼” and ½”. It is advisable to use the thickest that the space will allow for. The original rear bulkhead insulation should be replaced with ½” Dynaliner to achieve adequate depth (use the original rear bulkhead pad as a template), with a combination of 1/8” and ¼” applied to the floor pans. Whilst ½” Dynaliner can be applied in strips between the spring clips in the hoodwell area it is preferable to use a full roll of Dynapad to replace the hoodwell insulation pad. By carefully using the original underlay as a template two hoodwell pads can be cut to form a heavy duty barrier.
Reassembly
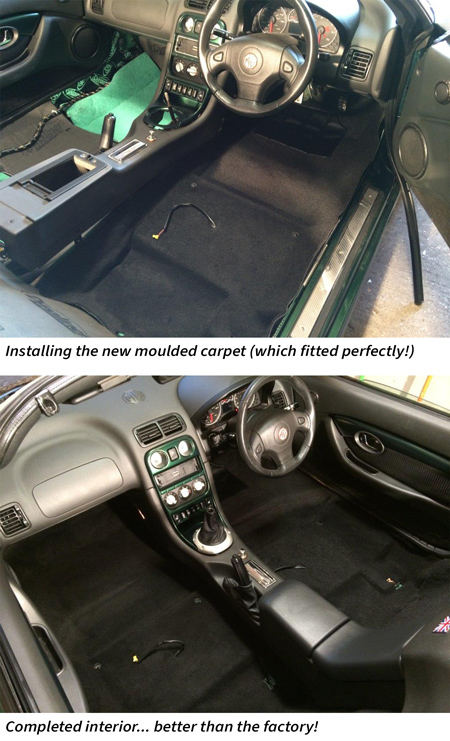
Re-fit all the plastic clips and secure the loom ties before refitting the carpets noting that it may be necessary to use a sharp knife to sculpt out sound deadening material around the rear seat frame fixing holes to aid later reinstallation of the seats. Refit the carpet within the hoodwell, secure the hood to the rear deck (reconnecting the heated rear window loom if applicable), and lower the hood. Place the carpets onto the floor pan and pass the pre-tensioner looms back through the carpet. Whether re-using the original carpet or renewing, a liberal application of contact adhesive carefully applied to the outer edges of the carpet nearest the sills and door jambs, then secured using large crocodile clips is recommended to achieve a professional installation. The same approached can be applied to the inboard transmission tunnel area for added peace of mind. Once dry remove the clips and use a rubber mallet to gently tap the door seals back into place. Fitting a new carpet offers several advantages over reusing the original which over many years of use may have become worn (particularly on the driver’s side, fit poorly (MGF) or have rotted foam deadening (as per MGTF). A new carpet set is supplied inclusive with soundproofing kit which can be combined with Dynaliner to achieve a plush, quality feel. Next refit the centre console rear bin, connecting the rear speaker loom and microwave security unit (if applicable). Secure the transmission tunnel, refit the console extensions (kick panels) not forgetting to reconnect the floor lights. Pass the seat belt fixings through the T bar and secure. Finally refit the seats, starting with the pre-tensioner looms, then the seat belt fixing before applying a light coating of copper slip to the seat frame fixings and securing firmly to the floor.
Two bulk Dynamat Extreme packs will provide optimum coverage of the cabin and hood well. With enough remaining to apply to the outer door skins and boot lid to achieve a reassuring ‘clunk’ on closing. You can also apply a combination of Dynamat and Dynaliner to the boot well to keep your ice cream frozen when driving back from the shops!
Driving Impressions Roger Parker
I have had prior experience fitting Dynamat to my MGB V8 with a very marked improvement over the standard car and I also recall that the high quality and very high specification MGB GT LE500 uses Dynamat throughout.
The effect in the TF is immediately noticeable and the extra insulation provides a much more refined driving experience. As MGF/TFs are becoming increasingly popular and more affordable forecourt bargains, they are being bought by older owners who want better levels of refinement. Such owners are more concerned with comfort rather than out and out speed, especially when driven over longer distances, perhaps on one of the MGOC Travel Club’s trips the lower noise levels would prevent fatigue. Owners will appreciate the reduction of sound levels in the cabin and a general improvement in the driving experience. The MGF is a quality sports car and the extra insulation enhances that impression of a more upmarket vehicle.
Driving Impressions Chris Bentley
The upgrade took a couple of days to carry out and remains well within the scope of your typical MG owner. The marked benefits of improved sound and thermal insulation far outweigh the investment of time and money. I can now hear the radio at lower volume, make hands free calls and enjoy longer drives without feeling exhausted. I’ve started restoring our 1964 MGB and plan to use Dynamat to full effect.
How much Dynamat and Dynaliner will I need for the best results?
What other products will you need for a professional job?
Having applied Dynamat and Dynaliner to the cockpit, the chances are you’re not going to reuse your old worn carpets and soggy soundproofing! MGOC Spares offers a full range of quality tailored carpet sets and tailored soundproofing kits to achieve a plush, quality result.
Who are MGOC Spares?
At MGOC Spares, we provide dedicated parts and accessories for classic MG vehicles, including the MGB, Midget, MGC and many more.
With thousands of products in stock, we are your one-stop shop for all your classic car needs. Our wealth of expertise means that you can trust us to find the right part for your classic MG vehicle – whatever it may be.
Need support finding the right parts for your MG? Contact us today, we're happy to help!